Translate

Tuesday, December 31, 2013

Wedding gift

My coworker's son is getting married this Saturday. She asked me to embroider 
their names, date and a little color for some flowers on a hanky for her to give 
to her future dil. I also made this little hanging to go along with the hanky.
 There is a  significance to the embellies. I stacked the two hearts,key 
and butterfly to say the key to their new life (butterfly) is two heart
 becoming one...the little single heart with the button..The heart
border was made with a MS punch. A dotted swiss 
folder embossed the triangle and some chalk to give it a
 more aged look. I colored the pearls to age them also. The 
flowers were punched with a few layers, a few leaves and
 the layers stitched puts it all together. 


Monday, December 30, 2013

New Years Card with piercing and chalk

is the Challenge this week at FOSTV! Do you make New Year Resolutions, 
do you have special plans for celebrating the New Year? It seems to be the
 time for some introspection and finding those things that could use
 some improvement or changing. Of course I always have a 
ongoing list to work on LOL!!
I chose to do something a little non traditional for and NY card, 
I started with the dotted dp that came grunged up
. At the top a little embossing and then edges cut and pierced. The 
center strip is embossed with a Dotted Swiss and matted on
 the white. The sentiment is stamped on a Spellbinder 
Scalloped Oval and mounted on a Scalloped Circle with a 
few piercings. The sentiment is from the 
Pussy Willows Set.I used the wet chalk  to
grunge it up a bit.

Hope to see you come join the fun this week!!

Entering Challenges:
Challenges 4 Everybody....Anything Goes

Friday, December 27, 2013

Time for a new Tutorial Time with Speedy TV Challenge....

Hope you all had a wonderful Christmas!! Ours was a little different, first time 
in my whole life I didnt spend it with family and have dinner together. My sis
 just got out of the hospital Christmas Eve and not able to together and my 
parents werent feeling well. My husband and I just hung out and had pizza 
which was a first for Christmas dinner LOL! This weeks TUTORIAL is 
a Sunburst Card. This was fun, easy and makes a very nice background.I 
went with dps in the green and blue tones then used the  Single
 Dogwood Blossom cut out and foam dotted on.
 The HB from the Today Tomorrow and Always Set.
 A little SU navy ribbon and its done.
Today is my daughters birthday and this is for her.
Stop over and give this technique a try, so easy you will love it!

Monday, December 23, 2013

Wedding or Engagement...


Friends of Speedy TV has a new Challenge today. Its wedding/ engagement. 
I deviated a bit and did an Anniversary card! I didnt have a wedding sentiment 
and didnt want to use a congrat one! My friend Martha sent me these cute 
papers for Valentines but I used this one on the Anniversary card. Simple 
with the embossing stitching and a few Spellbinder layered hearts. 
Stop by and see the beautiful cards my teamies made!


This pic made me laugh! I took it early Sat.morn before I left for Vegas. My sis
 was transported to the hospital there Thurs night. They were
 sleeping so soundly they didnt even wake up
 when the flash went off.

Our Boston has this pink blankie he pulls everywhere and
sleeps with. From the angle I took it the 
Chihuahua looks like he is on his side but was actually lying on his back
 with his legs straight up in the air.

Friday, December 20, 2013

A great weekend

hope yours was as well! Our new FOSTV Challenge is an easel card of any type. Easels are alway a nice switch from the traditional card. I didnt do anything fancy just a regular easel!

TUTORIAL TIME WITH SPEEDY TV

Today Lis has a tutorial on coloring beads. These tri shaped are the only white beads I had to use. After coloring them I added little white centers.My sentiment is from the Christmas Cardinal Set. A little bakers twine my friend Martha just sent me for Christmas tied the bead on. The little gingerbread men were embossed.

Monday, December 16, 2013

Love the Cardinals..

from the Christmas Cardinals Set. I have used the one with the holly for my card today.
 The Friends at Speedy TV Challenge this week is what else but a Christmas Card!
If you are like me there is always a last minute one you need . I have colored mine and 
cut it out with a Spellbinder Scalloped Oval. The red tab was embossed with 
a snowflake folder. The stripped dp stitched on and all was attached.
 I had in mind a gold button but just didnt have one the right size so 
had to make do with white. Be sure to stop by and join 
in our Challenge this week.

Friday, December 13, 2013

A Z fold card

is the Challenge at TTSTV #80 this week.There is a great tutorial 
that makes it very easy if you dont already know how
 to make one! Im trying to get my Christmas Cards
 finished up so this one is a bit masculine for my brother The dp paper is 
           stitched onto the hunter green base. The Sentiments are from the
    Poinsettia Blooms Set.The band is punched with a 
MS arches punch, the gold is a strip 
embossed with Judikins Egyptian Gold. The deer is from
the new Dec.release Bow Hunting Set  heat embossed
in brown and cut out. I mounted it onto the Spellbinder Scalloped 
Circle and added to the band. The flourish is a MFT die.

The sides lift up in a Z fold to reveal the inside. I stitched the dp
on the insides of the fold. The inside center was stamped with the
tree also from the new Bow Hunting Set. The sentiment is from the
You're An Angel Set.
We would love to see you stop by and join in this week.
My teamies have plenty of GREAT inspiration for you!

Tuesday, December 10, 2013

Tuesday Throwdown Team B

Ours sponsor is Meljens Designs and they have the sweetest whimsical designs
for us to use this week. Since I have need of Christmas cards I have used all four
of the designs. Our CHALLENGE is What Christmas means to you.First and
formost for me its celebrating the birth of our Savior.


For the first card I used the Pretty Pointsettia image, printing it twice, cutting it out and foam dotting onto the base, which was cut with a Spellbinder Scalloped Circle. The little dots were Stickled with red for a little sparkle. The punched edgings are made with a MS punch. The sentiment was punched out with SU punches.


The Second card uses Star Snowman. I had a piece of blue that was printed with lots of swirls and
snowflakes but they dont show much.In person the light blue is a nice match. Two of the snowflakes
 are MS and the lacey one was a gift from Cheryl a former teamie and I dont know who makes it. I think it must be one from the UK. The star is a Spellbinder folded for a little dimension. The sentiments
were computer generated.


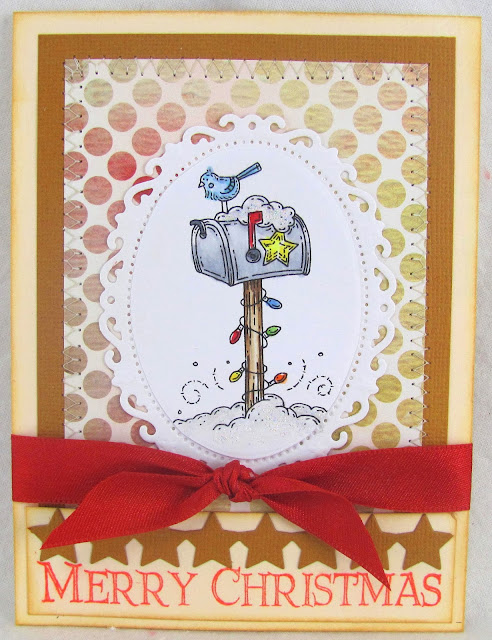
The Third uses
Cheery Lights, which
 I colored and cut
out with a
Spellbinder floral
oval. Next I  added
Stickles on all the
snowy areas for
 some added
sparkle. The
dotted dp had a
bit of red shading
here and there
 but I decided to
use the gold as a
 backing and red
 ribbon for the
 accent. I used
some Tim Holtz
 ink to distress all
 the edges on the
creme base and
on the sentiment.
The stars were
cut with a PTI
 border die.


The Fourth uses Marshmallow Snowman, I printed this one three times in graduated sizes and colored. Although it doesnt show I used raised paint to make little snowflakes plus added two sizes of the punch outs. It does look cute in person. Some fun non traditional dps and stitching to make the layers and a MS punch for the bottom edging backed with the aqua so the punch outs would show. The little red tab was made by stamping on red then cutting out with a Spellbinder oval.

Monday, December 9, 2013

White and Silver...

Happy Monday to you all hope you are staying warm
. Here in the U.S. much of the country is experiencing Very cold temps.
My friend Martha in Minnesota is having below 0 temps and even here 
in the desert it is freezing, unfortunately some of my garden got it even
 though things were covered! Monday means a new 
 embossing folder for the base of my card, then a old 
Spellbinder die for the silver metal. I used a white brad 
at each corner. The silver embossed sentiment is from the 
Poinsettia Bloom Set.
A little jewel garland across the bottom and a jewel in the
 snowflake for a little more sparkle. I like the wintery look
 that it has. Come join us this week and you could
 be the lucky winner of the stamp set!


Friday, December 6, 2013

Tutorial Time with Speedy TV


Are you as ready for Friday as I am, its been one crazy week in my world~ 
The new TTSTV Challenge is faux linen. Our tutorial is brought to us this
 week by Pam Stang found here. I didnt have glossy paper so had to make
 do with some semi gloss paper. The linen effect isnt quite as nice as on
 glossy paper but still give a decent look. After stamping it with the Just a Note
  image I used the ink to darken the sanded lines for the linen look I 
stitched it on to the deep red and then matted on the creme base. The band
 was stamped with the sentiment from the Poinsettia Blooms Set
 and bordered with gold Stickles. The angel is from the  
You're An Angel Set  and was stamped with Versamark
 then embossed with Judikins  Egyptian Gold,
cut out and pop dotted on.


Monday, December 2, 2013

Anything but a card....


Friends of Speedy TV #102 has a new challenge today and
its anything but a card. My project is napkins.I have had some
 fun homespun Christmas Fabrics in my cupboard for about
 6 or 7 years. My sewing machine broke shortly after I 
purchased them so into the fabric cupboard they went. I'll spare you all the details 
but making gifts  is a necessity this year, so dragged out the fabrics and
decided to use them for tablecloths. I have 
three different prints and each is enough to make 2 tablecloths.


 However there isn't enough to make napkins so I thought the little snowman 
image from the  Holly Jolly Greetings Set would be perfect. I really
 didnt plan this out well or I would have done it totally different!!


 I stamped the little snowman planning to use it only but  it 
looked so plain so I added the little holly sprigs
 from the same set. I used fabric paints to paint all the images and when
 finished they didnt really seem to go with the tablecloth so I added the little 
checked borders like the cloth had  and a little blue in the background 
to try to bring them together better. Now the border is so close to the edge that
 instead of hemming as I had planned I need to serge the edges.OF course wouldn't you know I broke 
a needle and dont have a spare so have to wait until I can get to town 
to get another needle. Thus the unfinished edges!

 After all was said and done, I should have stamped a partial image
and put into the ornament like the print 
on the cloth but after all the work of stamping and painting them 
I didnt want to start all over again!! You know the old saying" the best laid
plans of mice and men"....thats the story here!! But the next set will 
be planned and certainly be better LOL!

Friday, November 29, 2013

Masking Tape Technique is

the the TTSTV Challenge this week. Lis Robson has a great tutorial here 
I have never done this one before but it is quick,easy and gives great results! 
I cut out a base added all the tape then wiped Tim Holtz antique linen ink
 over it and wiped back off. It darkened the edges of the tape and gives it 
almost a stone look. I then ran it thru an embossing folder for a little 
added texture. This image is one of the new November Releases 
 Out On The Town, don't you love the simple lines and vintage look!
Wanting to keep this CAS so the background would show. The
 birthday flag was cut with a Spellbinder Pennant die and the 
flower is cut from a PTI die with a giant brad for the center.
 This technique could be used in so many ways, 
you need to give it a try!!


Monday, November 25, 2013

A Faith Banner

is my project for our ANYTHING Goes Challenge at FRIENDS OF SPEEDY TV
 I'm trying to get a few gifts made as Christmas is just around the corner. This 
is a challenge everyone of you can join in so take the time to stop over. You may
 be the winner of a new stamp set!

For my banner I have used the Spellbinder Pennants as a base.
 The dp sort of a rose color with little pale green dots. I added some 
distressing, and raised dots in a few areas then stitched them onto 
the pennant base.I made flowers and then just added butterflies,
 buttons and a variety of embellies. I really didnt have a lot of 
embellies to add so just combined things I had. I dyed some ribbon
to hang it on, just weaved it thru the loops on the top.
LOTS of pics on this one


 I used the Dogwood
Flower from the
 Dogwood   
 Blossom Set of the first one. Made a layered flower and attached to a snowflake. A heart button, dressmaker form , a flourish and a butterfly to embellish it. The background is a Memory Box tree die. Both the layers of Love were punched with SU punches.The word comes from the Lotus Blossom Set. The little postal stamp that barely shoes comes from the All Postal set.The F is a punch out letter that I embossed.


More button, flourishes, and butterflies. I received these dies as a gift so not sure who the maker is.
I cut and embossed a piece for the top of this one. The green flourish is a piece of a Cherry Lynn die. The  metal key was cut from a PTI die and then ink added to it. The hummer is from the Hum Along Set, colored with some watercolors.


A Spellbinder tag was used to mount the I on and the flower cut with at PTI die. The little love stamp was from a Provo die. A few beads and buttons finish it off. The peace came from the Columns & Topiary Set.


I made a burlap flower pearl center and mounted it on another Spellbinder Tag. A little flourish o the bottom. A embossed heart, and another butterfly. I added a brad and button to the little stamped lacy medallion. The forever is from the All Postal Set and cut with a Spellbinder banner.


The last pennant has a piece of the Cherry Lynn flourish behind the H. The Have Confidence was punched with a SU punch and comes from the Today Tomorrow and Always Set. The flower was made from glassine paper and sprayed with some Glimmer Mist. The flourish was dotted and distressed with ink and little flower button added to it. I used three different butterflies on this one and added the beads.


Hope you will stop by and show us your Anything Goes Creations!  ALSO want to wish my friends in the U.S. A HAPPY THANKSGIVING and if your are traveling SAFE TRAVELS...BLESSINGS!!

Friday, November 22, 2013

THIS WEEKS TUTORIAL TIME WITH SPEEDY TV

is brought to you by me. If you hop over to the TTSTV CHALLENGE
you will find the tutorial I made on Making Your Own Chipboard.


Its fairly quick and easy to do. I made
 a variety of things up for examples and have used several of them on my little mixed media
 piece today. I started with a little canvas stamping it with the Just A Note and Cracked  Hello in different spots. Next I used paste and stencils followed with some paints and inks.

 The frame is one of the chipboard pieces
 I used some paints on and then backed it with a piece of dp
 that has some sparkle on it.The chipboard dressmaker form
 was  stamped with the Just A Note then lace, a rhinestone and
 button added to dress it up.It was foam dotted on. The button is 
also a chipboard piece, embossed, painted. and added glossy accents to.
The sentiment if from the Be Wild & Free Set! Reminds me of how
we should be when we create, letting ourselves be free to be us!
The flower was cut with a Spellbinder carnation die and a pearl
 center added.
All was fixed to a piece of burlap with a little crocheted trim.
 The piece is hung with the
 chipboard flourish I made. If you have dies or punches ir is easy 
to make whatever you want and  give it 
the treatment you desire! All the girls
have lots of creative ideas for the chipboard you will want to check out!
It's lots of fun so join us this week
Today is my birthday and I have a couple packages from
my sisters looks like some fun new crafting goodies , will
have to share them soon :)

See you there!

Monday, November 18, 2013

Friends of Speedy Tv is Challenging you

to make a Thanksgiving creation.I have made a pop up card for my sister.
Using the Autumn Splendor  Set I colored and cut out the Pumpkins and acorns.
 The sentiment from the I Am Thankful Set was stamped onto the  Lost & 
Found dp and cut with a Spellbinder tag then foam dotted onto anther Spellbinder
 tag. The top of the yellow was cut with a Spellbinder Scallopped Oval and then 
Embossed. The L&F striped dp was added behind the oval. My birthday is
 this Friday and my sweet sis gave me part of my gift early, some burlap! I 
used it for the leaves and for the scalloped border on the bottom. More 
striped dp for borders and lastly the three pumpkins were tabbed and 
attached so they lay down when the card closes.

Friday, November 15, 2013

Tutorial Time with Speedy TV

has a new challenge today, its an altered notebook cover
I used the dp for my inspiration. The notebook was black so I sprayed it 
white first.Using the Huge Blossoms Images I stamped and heat embossed 
them cutting out the white and yellow one. . I wanted to used the yellow 
and red to go with flowers on the dp.  Cut and embossed a leaf to add a little
 green. Part of the sentiment is stamped onto a Spellbinder label and the 
other on the red. I love these little power packed words from the 
 Today, Tomorrow And Always Set! God made each of us special and 
even with our flaws we can walk with confidence each day knowing
 that His love & forgiveness to us is abundant! Finally I used a 
ribbon to tie my notebook closed, so it makes a
 great one for my daily journal.
 My Teammates have a fabulous variety of ideas
so be sure to stop by and join us this week.
Add caption


Tuesday, November 12, 2013

Tuesday Throwdown Team B Challenge

is Gratitude. As Thanksgiving is quickly approaching
 we tend to focus more on gratitude, but really each day we need to be grateful!!Our
sponsor this week is Sweet N Sassy. 
The image I used is called Autumn Collage. After water coloring it I cut it out 
and mounted on the checked mat. The base was dry embossed and another mat 
added. The little leaves were colored and  punched and the black
 border cut. The sentiment was foam dotted on.
Come join in and show us your lovely creations this week.


Monday, November 11, 2013

TORN Paper

is the challenge this week at Friends of Speedy TV. 
 The purple was torn on the edge then added to the dp and all stitched on. 
A little  more tearing and distressing of the edges. I tore dictionary paper into
 three sizes of circles to make each flower. Added a little ink and paint, 
scrunched and made little balls that I dotted with green for centers
.I made a little chipboard leaf and added several different paints to it.
The hummer is from the Hum Along Set. The sentiment was 
added to a Spellbinder label and foam dotted on.

My teammates have lots of creative inspiration for you this week. Come over and 
join in the fun, you may be the winner of this weeks stamp set!
 Also wanted to thank you all  So much for  all your prayers,comments
 emails and well wishes for my husband.He is Greatly improved 
 and Im very thankful!!!

Friday, November 8, 2013

Tutorial Time with Speedy TV

The Challenge is paper towel embossing

Monday, November 4, 2013

Friends of Speedy Tv

Our new challenge at FOSTV is a sympathy card. I kept mine simple for a peaceful look. Please stop over to see the teams cards and join us. Sorry for short post my husband is dealing with a serious health crisis.

Friday, November 1, 2013

12 DAYS OF CHRISTMAS Challenge AND TUTORIAL TIME with Speedy TV

  
TODAY is day 11 and the challenge is BANNERS.... If you hop over to 
Marks Finest Papers a Heinrich Co 12 Days of Christmas there is a tutorial on
 making a banner and you can join 
in the fun. There will be a daily winner picked AND the Grand Prize is 20 stamp sets of
 your Choice!! Be sure to take this opportunity to join in~


The Spellbinder pennants turned upside down made for a
perfect for a tree shape. After cutting the pennants the green was  cut,
embossed and edges distressed then added to the pennant.
 The striped tree is cut from a PTI die and a star topper added. 
The snowflakes were cut from a die and punches and layered around. I know
Butterflies and snowflakes may seem like a odd combo but
it needed a topper and in my crazy world it works. Some of the 
snowflakes were glittered up to give them some shimmer in person.
 A few buttons tied on and attached each pennant to a thin
 sisal rope, there you are a quick little banner.


 Today for TUTORIAL TIME WITH SPEEDY TV 


Pat has given us a great tutorial on two tone resist
It is a great technique with a nice variety of results. I started with pastels 
on white then stamped the Pocket Watches Set with versamark and added 
clear embossing powder. After heating it I went over it with some
 brown ink. The areas that weren't embossed are the brown areas.
 I then added it to a piece gold then onto the embossed creme cardstock. 
 The little corner designs are from a die that has no name on it
. The pocket watch is from the Take the Time Set, cut out and
foam dotted on. A bold black sentiment for a  simple card.


Tuesday, October 29, 2013

Team B's TUESDAY THROWNDOWN CHALLENGE I


Sorry I don't know how to do a post that stays at the top so just 
putting this on top of each post to remind everyone that Marks Finest 
daily prizes plus a Grand Prize of 20 Stamp Sets of your Choice!!

TUESDAY THROWDOWN CHALLENGE


Is Witch way to the candy. Out sponsor is Robyn's Fetish. Be sure to visit their 
store for a huge supply of images for every occasion.
I have used the Mimi Halloween 1 image.
 I had a little piece of paper that gave inspiration for coloring her. She is cut 
out and mounted on the purple. The Sentiment was cut with a Spellbinder 
banner die  and attached with a button. The dp and yellow were stitched 
on and the little row of suckers added. The ribbon is a salvage off a
 wedding invite I received a couple weeks ago, and the perfect color!


Monday, October 28, 2013

Its a Halloween Challenge at

Be sure to stop by and join the Challenges
there is a daily drawing and a Grand Prize Drawing for 20 Stamp Sets of your choice!!


Friends of Speedy TV. I don't celebrate Halloween so this isnt my favorite challenge.
 I tried to make it bright and lighthearted with the colors. I used several sets for this 
one. The image and Happy Halloween are from Im Going Batty Set, the boos and
 cat are from the What A Scream Set. I cut out a dp in a half circle and embossed 
and then stamped the black all over with the boo sentiments. The stars and purple
 were cut out with Spellbinders. The cat was stamped with white then cut out 
and foam dotted on. The bat is from a little set my friend sent me stamped in the
 grey and cut out. The the silver stars are cut out of metal..


Friday, October 25, 2013

Friday Challenge

The Grand Prize is 20 Stamp Sets plus daily gifts also


for Tutorial Time With Speedy TV is Fruit Background. 
 Using fruit to create dp was fun!!

 I had a lime on hand so used it to
 create my background First 
mixed a dusty blue, seafoam,
 olive and a bit of lavender ink 
together then dipped the lime slice in them and 
pounced on the paper. I did use a little pressure to get all the ink on the paper so the fruit isnt real defined but I do like it Actually the color looks mostly grey in the pic but in person is more aqua looking..It did make for an interesting look.
Used a soft aqua SU paper for the 
scalloped circle, sentiment and little border strip. A little aqua striped 
dp was punched with a Dotted Scallop MS punch.My pretty peacock
 is from the Be A Showoff Set. After coloring and cutting out the
 peacock I added some Stickles for a little shimmer to show off his
 majestic feathers. Some dots added to the scallop circle and a little 
flourish for Mr Peacock to perch upon. He was pop dotted on. 
The sentiment is from the Ivy and Blossom Set  with a couple little jewels to sparkle it up a bit.  We all used 
different things for this technique and got lots of very cool
 results so be sure to stop by and check out all my
 teammies fabulous creations!!


Just had to share my wonderful gift from my sweet jewel of a friend Martha! She
 sent me a early birthday gift and it is quite the gift, a cool 12x12 storage box FULL of 
paper! Check this out EVERYcolor and design you can imagine plus some
 Washi tape, cute little stamp sets and the foam dots that I used all the time!